blockchain - 使用 ethereum.rb 初体验和在 FUJI test network上的踩坑经历
访问量: 1154
安装, Gemfile:
gem 'ethereum.rb' # 这个仅支持 2.x, 不支持 ruby 3
# 想要支持ruby 3, 就用这个,不过由于 gem 'eth' 目前不支持ruby 3, 所以暂时不建议使用。否则无法发送tx
gem 'ethereum.rb', :git => "https://github.com/EthWorks/ethereum.rb.git", ref: "4a81fed12f0698627638f3e70acf05a261712b21"
完整的Gemfile 如下:
 source 'https://rubygems.org'

 gem 'ethereum.rb', :git => "https://github.com/pnsproject/ethereum.rb.git"  # 这里用了我们自己的fork
 gem 'eth'
原理
ethereum.rb 支持2种操作形式
一种是接近于本机命令行的 ipc 模式,
(需要我们先准备一个eth node ,然后在该node上运行 web, 例如:
$ geth account list
eth> account list
该模式默认会使用 该节点的 coin base. 入门快,但是对于初学者很不友好。另外局限性就是需要安装节点
一种是JSON RPC
我们要用 JSON RPC这个模式
使用 (以下都是JSON RPC的使用方式)
require 'ethereum.rb'
#这里要指定一个rpc .  估计infura也是一样的
client = Ethereum::HttpClient.new('https://api.avax-test.network/ext/bc/C/rpc')

# 这里的from, 在原生的raw RPC中,只要地址合法即可,不需要里面有任何资产
#但是在 ethereum.rb 中,如果该地址 没有资产,就会报错
client.default_account = '0xa97D4D83Bb3EFE403E1e02B079A21B89947cE7A6'
# 这里必须要 .to_i  否则该参数不会被转换成 hex ,后面也会报错
client.gas_price = (25 * 1e9).to_i

# 这个abi需要根据contract的源代码编译生成。
abi = %Q{[ { "inputs": [], "name": "retrieve", "outputs": [ { "internalType": "uint256", "name": "", "type": "uint256" } ], "stateMutability": "view", "type": "function" }, { "inputs": [ { "internalType": "uint256", "name": "num", "type": "uint256" } ], "name": "store", "outputs": [], "stateMutability": "nonpayable", "type": "function" } ]}

# 这里是声明一个contract变量,name 必须指定,随便起,address, abi, client必须是正确的。 例如我们在 FUJI网络上部署了一个合约(abi),地址尾号39BF
contract = Ethereum::Contract.create(
  client: client,
  name: "Sample",
  address: "0x3d27fbCBACBb0a0134Bf2CEF88ee75A27A28d1d3",
  abi: abi)
# 注意: 在FUJI 网络上只能用这个方法, 不能用官方文档中提到的  contract.transac.xx
contract.call.retrieve


# 注意:官方文档提到的该方法不可以调用,在 FUJI网络上不支持 。出错信息: the method eth_sendTransaction is not available
# 原因应该是该方法在2019年中旬开始 在ETH网络上就被标记为 deprecated.
contract.transact.retrieve
调试的准备-特别重要
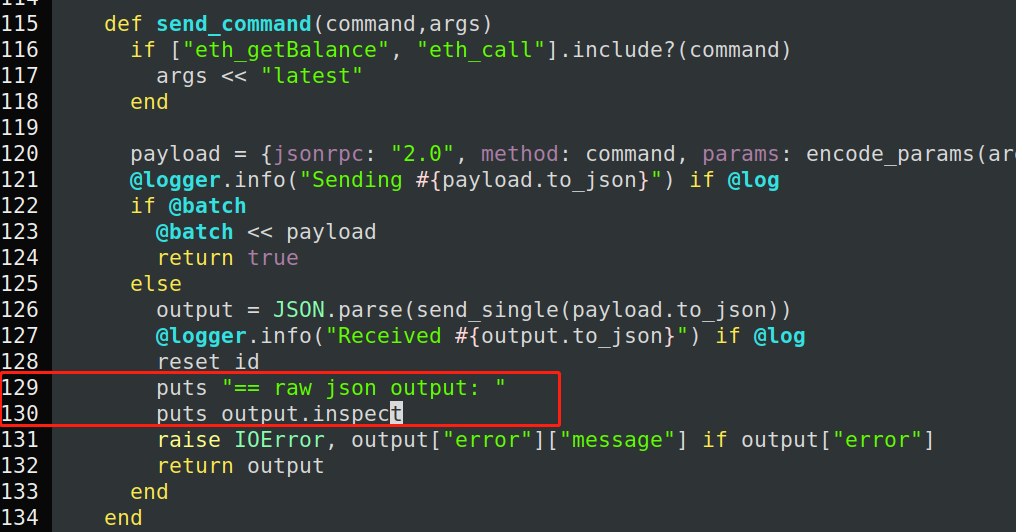
可以打开最原始的json rpc的结果,来进行调试。这样的话信息更加直观,方便修改。
ruby/gems/3.0.0/bundler/gems/ethereum.rb-4a81fed12f06/lib/ethereum/client.rb (文件路径需要根据你的情况修改)
为该文件 129行位置, 进行输出。
同时,修改该gem 目录下的lib/ethereum/http_client.rb, 这里是看发送的参数,特别重要。
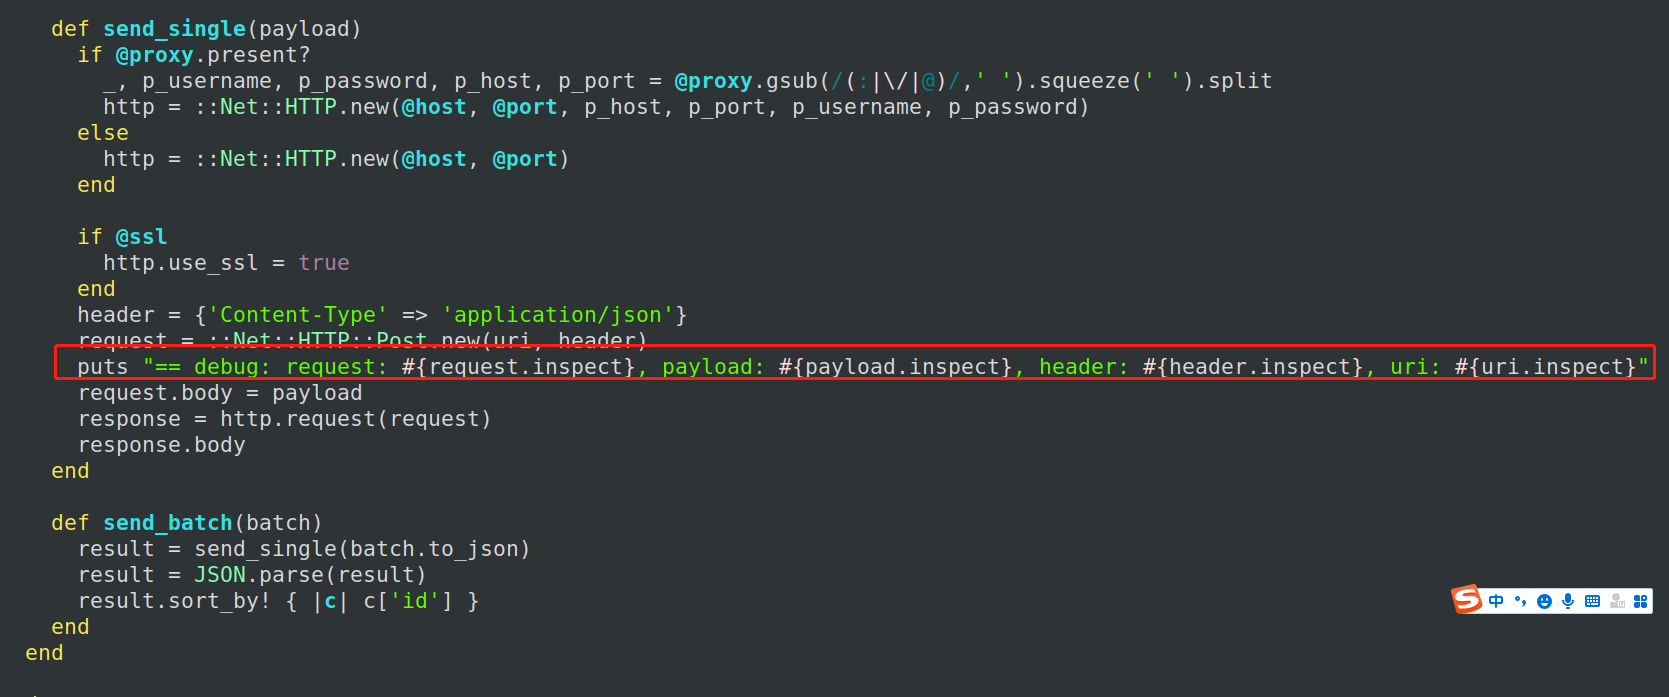
也就是为send_single 方法增加这个语句:
      。。。。
      header = {'Content-Type' => 'application/json'}
      request = ::Net::HTTP::Post.new(uri, header)
      # 增加这一行,非常关键,直接调试这里就好了。
      puts "== debug: request: #{request.inspect}, payload: #{payload.inspect}, header: #{header.inspect}, uri: #{uri.inspect}"
      request.body = payload
      。。。。
调用智能合约
先看一个 raw json-rpc的例子:
curl https://api.avax-test.network/ext/bc/C/rpc -H 'content-type:application/json;' -X POST --data '{"jsonrpc":"2.0", "method":"eth_call", "params":[{"from": "0xa97D4D83Bb3EFE403E1e02B079A21B89947cE7A6", "to": "0x3d27fbCBACBb0a0134Bf2CEF88ee75A27A28d1d3", "data": "0x2e64cec10000000000000000000000000000000000000000000000000000000000000000"}, "latest"], "id":1}'
可以看到返回的是:

文字版结果:
{"jsonrpc":"2.0","id":1,"result":"0x0000000000000000000000000000000000000000000000000000000000000142"}
获得ABI
ABI需要根据源代码编译后获得(参考remix IDE),所以你必须得有contract source code
如何获得 abi参考:https://ethereum.stackexchange.com/questions/3149/how-do-you-get-a-json-file-abi-from-a-known-contract-address/47413
调用contract 方法
// SPDX-License-Identifier: GPL-3.0

pragma solidity >=0.7.0 <0.9.0;

/**
 * @title Storage
 * @dev Store & retrieve value in a variable
 */
contract Storage {

    uint256 number;

    /**
     * @dev Store value in variable
     * @param num value to store
     */
    function store(uint256 num) public {
        number = num;
    }

    /**
     * @dev Return value
     * @return value of 'number'
     */
    function retrieve() public view returns (uint256){
        return number;
    }
}
它的abi如下:
[
	{
		"inputs": [],
		"name": "retrieve",
		"outputs": [
			{
				"internalType": "uint256",
				"name": "",
				"type": "uint256"
			}
		],
		"stateMutability": "view",
		"type": "function"
	},
	{
		"inputs": [
			{
				"internalType": "uint256",
				"name": "num",
				"type": "uint256"
			}
		],
		"name": "store",
		"outputs": [],
		"stateMutability": "nonpayable",
		"type": "function"
	}
]
调用只读方法 ( read only method)
所以,我们可以这样调用上面contract的retrieve()方法。(该方法只读,不需要发起任何tx)
require 'ethereum.rb'

client = Ethereum::HttpClient.new('https://api.avax-test.network/ext/bc/C/rpc')

# 这里的from, 在原生的raw RPC中,只要地址合法即可,不需要里面有任何资产
#但是在 ethereum.rb 中,如果该地址 没有资产,就会报错
client.default_account = '0xa97D4D83Bb3EFE403E1e02B079A21B89947cE7A6'
# 这里必须要 .to_i  否则该参数不会被转换成 hex ,后面也会报错
client.gas_price = (25 * 1e9).to_i

abi = %Q{[ { "inputs": [], "name": "retrieve", "outputs": [ { "internalType": "uint256", "name": "", "type": "uint256" } ], "stateMutability": "view", "type": "function" }, { "inputs": [ { "internalType": "uint256", "name": "num", "type": "uint256" } ], "name": "store", "outputs": [], "stateMutability": "nonpayable", "type": "function" } ]}
contract = Ethereum::Contract.create(
  client: client,
  name: "Sample",
  address: "0x3d27fbCBACBb0a0134Bf2CEF88ee75A27A28d1d3",
  abi: abi)
# 注意: 在FUJI 网络上只能用这个方法, 不能用官方文档中提到的  contract.transac.xx
contract.call.retrieve
调用 “写”方法
例如,上面contract中的 store(uint256), 就是把一个值写入到ETH网络上。
ETH调用合约进行写入的本质,是 send_rawTransaction(from, to, data) 这三个核心部分组成
from是当前account,
to 是contract address,
data 则是由2部分组成: 方法名 + 参数。
方法名; 0xa1b2c3d4 合计10位
参数:例如该函数有2个参数的话,就是这样: [0,1] ,然后给他hex化,数字"1"就是 000000.....00001 (合计64位)
好在这些工作这个gem都帮我们做了,我们需要的就是:
1. 获知from account的private key, 或者 json + password
2. 获知其他参数 ( chain_id, nonce 等)
这里有个坑,ethereum.rb 每次都会查询对应的 chain_id, 占用时间,很慢不说,关键是 FUJI test network告诉我们的network id 正确的是 43113, 可是该网络的JSON-RPC 的方法返回的net_version 却是1. 这个是fuji 的bug
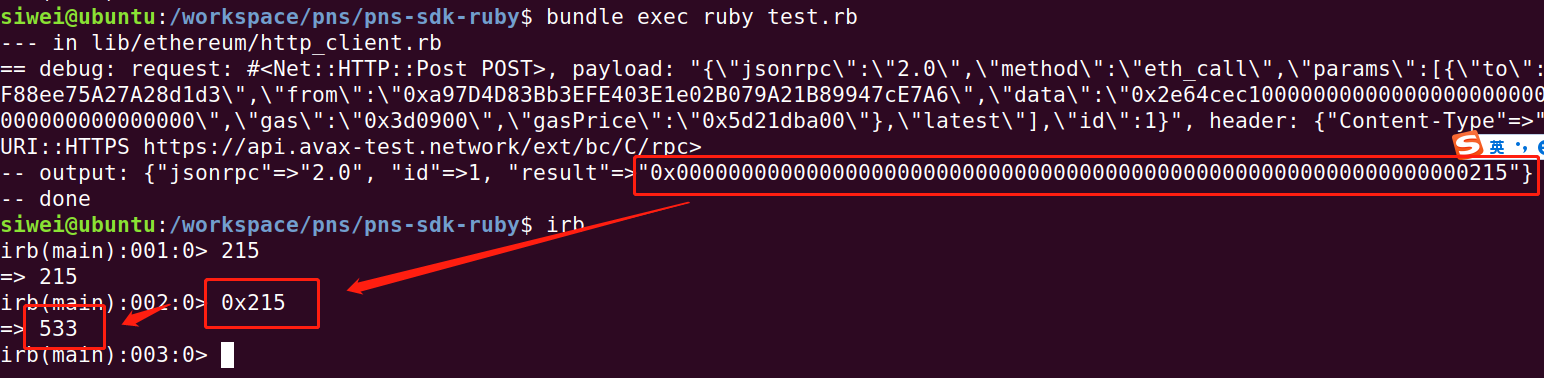
代码如下(第一行是ruby的payload, 第二行是打印出来的结果,可以看到 result => 1)
request: #, payload: "{\"jsonrpc\":\"2.0\",\"method\":\"net_version\",\"params\":[],\"id\":1}", header: {"Content-Type"=>"application/json"}, uri: #
-- output: {"result"=>"1", "id"=>1, "jsonrpc"=>"2.0"}
所以,我们需要修改对应的gem的代码;
lib/ethereum/client.rb
    def transfer(key, address, amount, options = {})
      # 这里的 net_version 是 一个动态生成的方法,该方法会实时查询对应的网络的chain id
      # FUJI 测试网络的正确id 是 43113, 但是它的 net_version 返回的方法却是1 ,所以要注意
      chain_id = options[:chain_id] || net_version["result"].to_i

      Eth.configure { |c| c.chain_id = chain_id }
      args = {
        from: key.address,
        to: address,
        value: amount,
        data: (options[:data] || ""),   # 这里很重要。
        nonce: get_nonce(key.address),  # 这里也很重要,不过还好没问题
        gas_limit: gas_limit,
        gas_price: gas_price
      }
      tx = Eth::Tx.new(args)
      tx.sign key
      result = eth_send_raw_transaction(tx.hex)["result"]
      puts result.inspect  # 这里会打印出刚才的tx id
    end
下面,我们运行下面的脚本:(2个核心文件,一个是sdk.rb 一个是 这个脚本 例如叫 test_write.rb)
Gemfile:
source 'https://rubygems.org'
gem 'keccak256'
gem 'ethereum.rb', :git => "https://github.com/pnsproject/ethereum.rb.git"
gem 'eth'
sdk.rb 的内容如下:
require 'keccak256'
class Sdk
  def sha3_without_0x origin_string
    return Digest::Keccak256.new.hexdigest origin_string
  end

  # e.g.
  # double(int256)  should be "6ffa1caa" in ABI format
  #
  def get_abi_for_contract_method method
    return sha3_without_0x(method)[0,8]
  end

  # TODO only support integer
  def get_abi_for_params params

    params.map{|p|
      hex_amount = p.to_i.to_s(16)
      hex_amount.rjust(64, '0')
    }.join('')
  end

  def get_abi_for_data options
    return '0x' + get_abi_for_contract_method(options[:method]) + get_abi_for_params(options[:params])
  end
end
test_write.rb 的内容如下:
require 'ethereum.rb'
require 'eth'
require_relative 'sdk.rb'

client = Ethereum::HttpClient.new('https://api.avax-test.network/ext/bc/C/rpc')

# 注意这个账户仅存于FUJI网络, 地址是真实的
client.default_account = '0xe90dB7D3a84082015482f691dC93b62677EbD244'
client.gas_price = (25 * 1e9).to_i

# 这个private key也是真实的
key = Eth::Key.new priv: "932fc22e31207215c992e391b4f0764c5cc1ae7b02d22d771f6cf8182ff0b5fa"
puts key.address
address = "0x3d27fbCBACBb0a0134Bf2CEF88ee75A27A28d1d3"
amount = 0
# 这个sdk来自于上面的代码
data = Sdk.new.get_abi_for_data(method: "store(uint256)", params: [533])
puts "data: #{data}"
client.transfer key, address, amount, data: data, chain_id: 43113
输出内容为(这些内容大部分都是 调试信息,可以忽略)
0xa97D4D83Bb3EFE403E1e02B079A21B89947cE7A6
data: 0x6057361d000000000000000000000000000000000000000000000000000000000000031e
=== in gem, lib/ethereum/client.rb, transfer
--- chain_id: 43113
--- in lib/ethereum/http_client.rb
== debug: request: #, payload: "{\"jsonrpc\":\"2.0\",\"method\":\"eth_getTransactionCount\",\"params\":[\"0xa97D4D83Bb3EFE403E1e02B079A21B89947cE7A6\",\"pending\"],\"id\":1}", header: {"Content-Type"=>"application/json"}, uri: #
-- output: {"jsonrpc"=>"2.0", "id"=>1, "result"=>"0x15"}
--- in lib/ethereum/http_client.rb
== debug: request: #, payload: "{\"jsonrpc\":\"2.0\",\"method\":\"eth_sendRawTransaction\",\"params\":[\"0xf88c158505d21dba00833d0900943d27fbcbacbb0a0134bf2cef88ee75a27a28d1d380a46057361d000000000000000000000000000000000000000000000000000000000000031e830150f6a09ef99a3e1c668a0a08b82e7710ae14b570353f3917ef99e2392989e53ba4d1d3a074bef77715384356001ac8fc21546dafedcf7120cdb6f5a0d6309097c249c688\"],\"id\":1}", header: {"Content-Type"=>"application/json"}, uri: #
-- output: {"jsonrpc"=>"2.0", "id"=>1, "result"=>"0xb1535da5a78d907f5bad51b590edb0a85725fe5ec31cc9566887ef0a00b1607f"}
"0xb1535da5a78d907f5bad51b590edb0a85725fe5ec31cc9566887ef0a00b1607f"
上面最核心的是最后一行。可以看到这个transfer已经操作成功了,也就是对应的write操作,是可以被网络广播出去的。
然后我们打开对应的浏览器
https://testnet.snowtrace.io/tx/0xb1535da5a78d907f5bad51b590edb0a85725fe5ec31cc9566887ef0a00b1607f
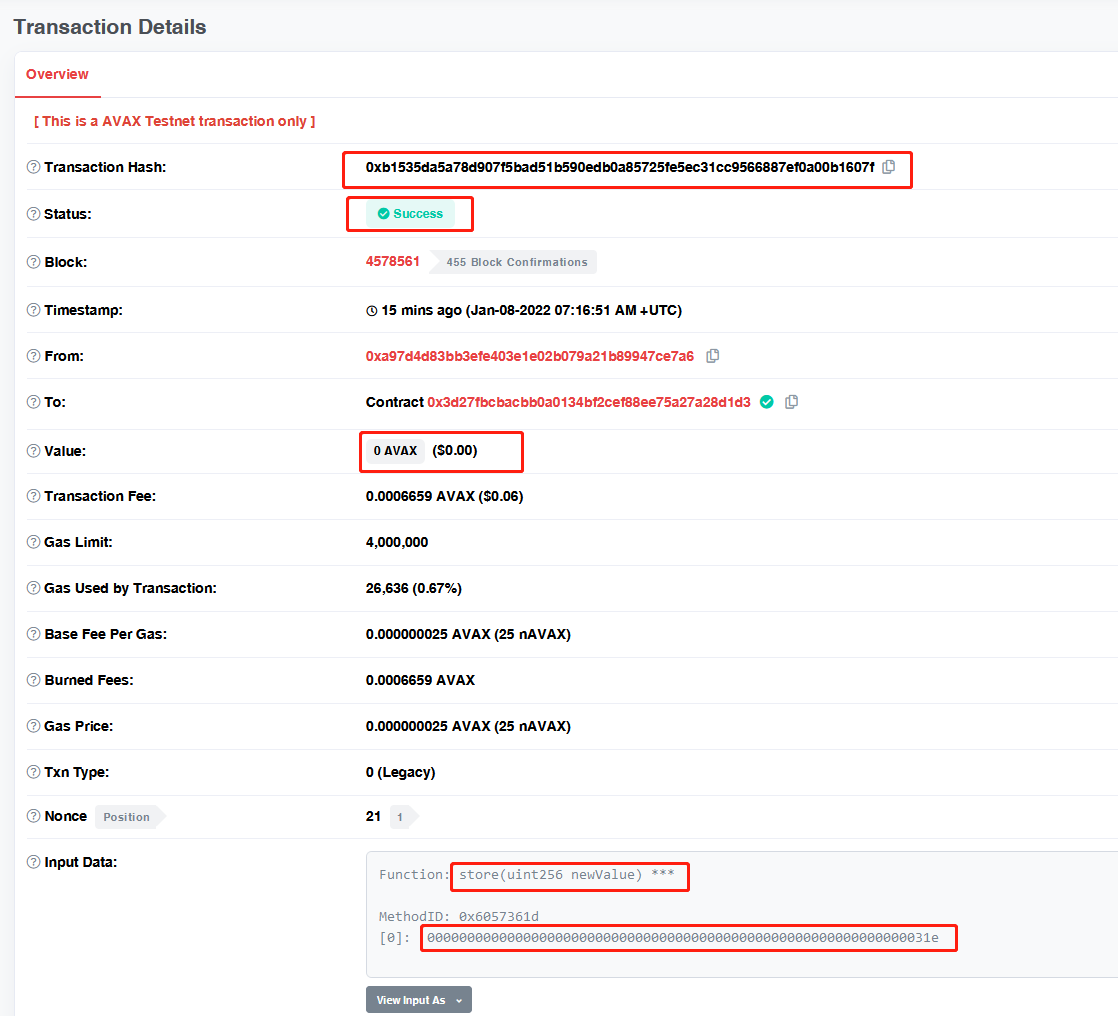
可以看到,TX成功执行了,上面的方法参数 0x31e ,也就是我们代码中的 798
大概等最迟1分钟,我们对这个contract进行查询,就可以看到retrieve方法也是最新的值了。
上面的setter方法也可以根据 ethereum.rb 自带的方法来调用。
@contract.call....
传入的参数,必须是 0x010203 (hex), 不能是 "0x010203" (string)