blockchain - web3 - solidity event log
访问量: 1239
refer to: https://ethereum.stackexchange.com/questions/16313/how-can-i-view-event-logs-for-an-ethereum-contract
https://medium.com/mycrypto/understanding-event-logs-on-the-ethereum-blockchain-f4ae7ba50378
EventLog 是EVM的重要部分,可以认为是:
1. 传统的log 用来debug
2. (主动通知作用:)作为solidity 函数的return结果(return是返回值给 其他function, event log则是传到链下)
可以使用 get 或者 watch
1. watch: 监听未来要发生的
2. get: 监听之前所有发生过的event log
3. 在某个tx的response中,就可以看出log.
例子: (truffle 项目)
假设我们有下面的这个contract:
$ cat contracts/TestEvent.sol
// SPDX-License-Identifier: MIT
pragma solidity ^0.8.0;

contract TestEvent {

  string message;
  uint256 amount;

  event HiEvent(string message, uint256 amount);

  constructor(string memory _message) {
    message = _message;
  }

  function sayHi(uint256 _amount) public {
    amount = _amount;
    emit HiEvent(message, amount);
  }

}
然后,调用方法如下:
$ cat callTestEvent.js
// contract 地址要有
const CONTRACT_ADDRESS = "0x6FCa9C7EDF4898cF8F0D48E60E1CcB51660505e6"
// abi 要有
const contractJson = require('./build/contracts/TestEvent.json')

module.exports = async function (callback) {
  // web3 是Truffle的自动引入的对象
  const contract = new web3.eth.Contract( contractJson.abi, CONTRACT_ADDRESS );

  // 获得 network , 这个是根据参数传入的
  const network = await web3.eth.net.getNetworkType()

  // TODO 这里最最关键。
  // 生成一个tx, 该tx是调用了 mintNFT产生的
  //const tx = contract.methods.mint()
  const tx = contract.methods.sayHi(44)

  // 发送!
  const receipt = await tx
  .send({
    from: (await web3.eth.getAccounts())[0],// 使用了HD wallet中的第一个account
    gas: await tx.estimateGas(),
  })
  .on('transactionHash', (txhash) => {
    console.log(`Mining transaction ... network: ${network}, tx: ${txhash}`)
    // console.log(`https://${network}.etherscan.io/tx/${txhash}`)
  })
  .on('error', function(error){
    console.error(`An error happened: ${error}`)
    callback()
  })
  .then(function(receipt){
    // Success, you've minted the NFT. The transaction is now on chain!
    console.log(
        `Success: The NFT has been minted and mined in block ${receipt.blockNumber}`)
    callback()
  })
}
我是在本地使用了ganache网络, 所以运行命令如下:
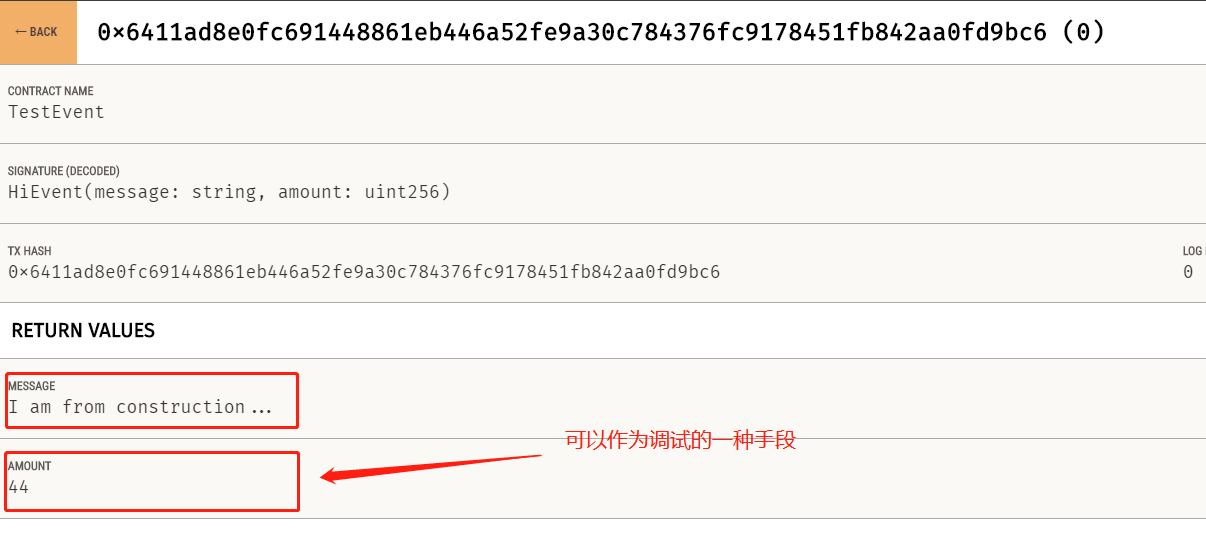
$ truffle exec callTestEvent.js  --network=ganache
Using network 'ganache'.

Mining transaction ... network: private, tx: 0x6411ad8e0fc691448861eb446a52fe9a30c784376fc9178451fb842aa0fd9bc6
Success: The NFT has been minted and mined in block 65

点击就可以看到详情了:
看一下如何在 js 中监听这个event :
通过 events.HiEvent.returnValues.message 就可以看到了。
// contract 地址要有
const CONTRACT_ADDRESS = "0x6FCa9C7EDF4898cF8F0D48E60E1CcB51660505e6"
// abi 要有
const contractJson = require('./build/contracts/TestEvent.json')

module.exports = async function (callback) {
  // web3 是Truffle的自动引入的对象
  const contract = new web3.eth.Contract( contractJson.abi, CONTRACT_ADDRESS );

  // 获得 network , 这个是根据参数传入的
  const network = await web3.eth.net.getNetworkType()

  // TODO 这里最最关键。
  // 生成一个tx, 该tx是调用了 mintNFT产生的
  //const tx = contract.methods.mint()
  const tx = contract.methods.sayHi(77)

  // 发送!
  const receipt = await tx
  .send({
    from: (await web3.eth.getAccounts())[0],// 使用了HD wallet中的第一个account
    gas: await tx.estimateGas(),
  })
  .on('transactionHash', (txhash) => {
    console.log(`Mining transaction ... network: ${network}, tx: ${txhash}`)
    // console.log(`https://${network}.etherscan.io/tx/${txhash}`)
  })
  .on('error', function(error){
    console.error(`An error happened: ${error}`)
    callback()
  })
  .then(function(receipt){
    console.log('====== total: ')
    console.log(receipt)
    console.log('====== events.HiEvent: ', receipt.events.HiEvent)
    console.log('====== events.HiEvent.returnValues: ', receipt.events.HiEvent.returnValues)
    console.log('====== events.HiEvent.returnValues.message: ', receipt.events.HiEvent.returnValues.message)
    console.log('====== events.HiEvent.returnValues.amount: ', receipt.events.HiEvent.returnValues.amount)
    // Success, you've minted the NFT. The transaction is now on chain!
    console.log(
        `Success: The NFT has been minted and mined in block ${receipt.blockNumber}`)
    callback()
  })
结果为:
====== events.HiEvent:  {
  logIndex: 0,
  transactionIndex: 0,
  transactionHash: '0x17a3f26aa9814465eb8ea5390552ee91e51134217fa4f070d2ff6389e9428918',
  blockHash: '0x5b4d306a6aa256dda472cf2b7e0c17ee24d49b19cae3f82d2405169bb8ba6c6e',
  blockNumber: 69,
  address: '0x6FCa9C7EDF4898cF8F0D48E60E1CcB51660505e6',
  type: 'mined',
  id: 'log_ab8dc71c',
  returnValues: Result {
    '0': 'I am from construction...',
    '1': '99',
    message: 'I am from construction...',
    amount: '99'
  },
  event: 'HiEvent',
  signature: '0xc3a44c66585c11d2584403022700a318b8c006ca535e7f155e74d478032edd28',
  raw: {
    data: '0x0000000000000000000000000000000000000000000000000000000000000040000000000000000000000000000000000000000000000000000000000000006300000000000000000000000000000000000000000000000000000000000000194920616d2066726f6d20636f6e737472756374696f6e2e2e2e00000000000000',
    topics: [
      '0xc3a44c66585c11d2584403022700a318b8c006ca535e7f155e74d478032edd28'
    ]
  }
}
====== events.HiEvent.returnValues:  Result {
  '0': 'I am from construction...',
  '1': '99',
  message: 'I am from construction...',
  amount: '99'
}
====== events.HiEvent.returnValues.message:  I am from construction...
====== events.HiEvent.returnValues.amount:  99
override下的event log:
跟普通方法一样, event log是可以被 override的。 (名称相同,参数不同的函数)
pragma solidity ^0.8.0;

contract TestVariable {

  string message;
  uint256 amount;

  event ShowVar(string name, address value);
  event ShowVar(string name, string value);
  event ShowVar(string name, uint value);

  function setMessage(string memory _message) public {
    message = _message;
  }

  function getMessage() public view returns(string memory){
    return message;
  }

  function setAmount(uint256 _amount) public{
    amount = _amount;
  }

  function getAmount() public view returns(uint256) {
    return amount;
  }

  function printVariables() public{
    emit ShowVar("msg.sender", msg.sender);
    emit ShowVar("amount", amount);
    emit ShowVar("message", message);
  }

}
对于上面的函数,设置好 对应的 amount ,message 之后,就可以直接调用 printVariables() 方法了。如下:
// contract 地址要有
const CONTRACT_ADDRESS = "0x5bEa39E27fD77739C6C8877666942D0aa8230961"
// abi 要有
const contractJson = require('./build/contracts/TestVariable.json')
module.exports = async function (callback) {
// web3 是Truffle的自动引入的对象
const contract = new web3.eth.Contract( contractJson.abi, CONTRACT_ADDRESS );
// 获得 network , 这个是根据参数传入的
const network = await web3.eth.net.getNetworkType()
// const tx = contract.methods.setMessage("today is 2022-07-06, hot day!")
// const tx = contract.methods.setAmount(321)
const tx = contract.methods.printVariables()
// 发送!
const receipt = await tx
.send({
from: (await web3.eth.getAccounts())[0],// 使用了HD wallet中的第一个account
gas: await tx.estimateGas(),
})
.on('transactionHash', (txhash) => {
console.log(`Mining transaction ... network: ${network}, tx: ${txhash}`)
// console.log(`https://${network}.etherscan.io/tx/${txhash}`)
})
.on('error', function(error){
console.error(`An error happened: ${error}`)
callback()
})
.then(function(receipt){
console.log('====== total: ')
console.log(receipt)
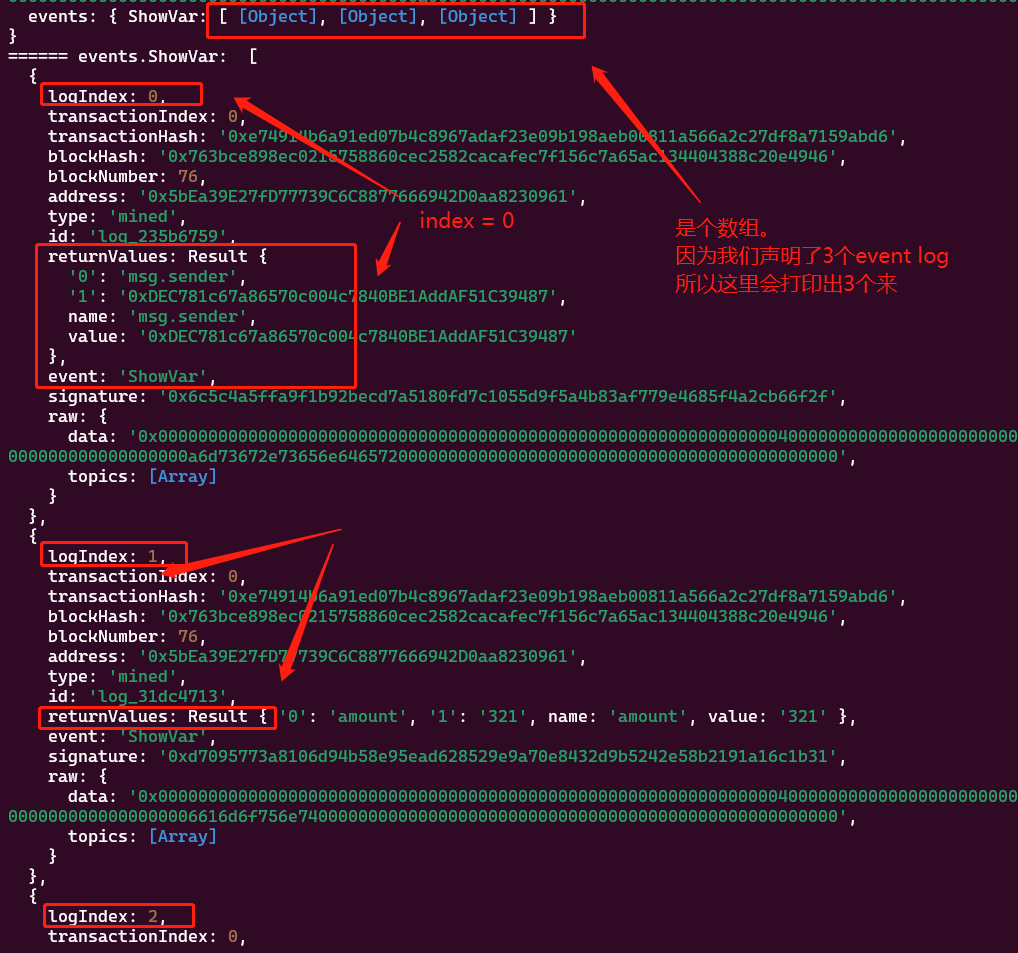
console.log('====== events.ShowVar: ', receipt.events.ShowVar)
// Success, you've minted the NFT. The transaction is now on chain!
console.log(
`Success: The NFT has been minted and mined in block ${receipt.blockNumber}`)
callback()
})
}
可以看到,返回的 receipt.events.ShowVar是一个数组(array) , 如下: