ruby - 终于给我的个人博客增加了 粘贴图片的功能 paste image from clipboard to blog
访问量: 1539
这个想法有了好几天了。 过去苦于增加图片的不方便,所以写博客的时候往往只能用纯文字,很不尽兴。
最近这个需求越发的旺盛,所以就想办法弄了一下。
核心的是使用了 http://siwei.me/blog/posts/javascript-html
也就是 clipboardData 这个变量。
不过由于我的个人博客基于 refinery-cms, 一个体量很大的CMS,集成了WYMeditor,所以研究了小两天。
记录一下过程吧。
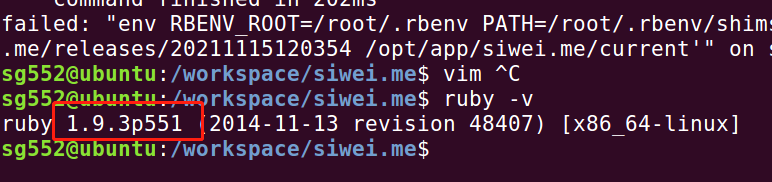
1. 搭建一个 ubuntu 16 vmware server.

因为只有 ubuntu16 才能很好的支持 ruby 1.9.3 , 在ubuntu18上无法安装 (通过rbenv )
2. 在本地运行好项目 (这个图无任何意义,就是为了让自己爽爽....)
3. 修改核心文件(js):
app/assets/javascripts/wymeditor/prototypes.js.erb
WYMeditor.editor.prototype.intercept_paste = function(e) {
  console.info("===  hihihi, in intercept_paste")

  var pasteEvent = e.originalEvent
  var item = pasteEvent.clipboardData.items[0];
  var wym = window.wym
  // 仅仅处理粘贴图片,
  if (item.type.indexOf("image") === 0) {
    var blob = item.getAsFile();

    var reader = new FileReader();
    reader.onload = function(event) {
      image_content = event.target.result
      // 发现是图片的话,把它上传到CDN上。
      jQuery.post('/interface/blogs/upload_paste_image_to_cdn', {image_content: image_content}, function( data ) {
        if(window.wym){
          window.wym.paste("<img src='" + data.url + "'/>", false)
          var wym2 = WYMeditor.INSTANCES[0];   // 这句代码只是用于演示。如何获得 wym实例。
          console.info("==== wym get by title:", wym2)
        }else{
          alert("window.wym is undefined, refresh and try again")
        }
      });

    };

    reader.readAsDataURL(blob);

  }else{

    var wym = WYMeditor.INSTANCES[this.title];
    wym.format_block();
    wym.exec(WYMeditor.PASTE);
  }
然后,又要修改该文件下的paste方法:
// 这里的方法入口,需要有第二个参数: is_escape.
// 用来把 CDN上的图片名称(我们刚刚上传上去的)合并到正文中。
WYMeditor.editor.prototype.paste = function(sData, is_escape = true) { wym = this; wym.format_block(); var sTmp; replaceable = $(wym._doc.body).find('#' + wym._current_unique_stamp); // replaceable doesn't actually get replaced here, it's just used as a marker for where the cursor was. container = replaceable.get(0) || this.selected(); //split the data, using double newlines as the separator var aP = sData if(is_escape){ console.info("=== is escape") aP = sData.replace(/&/g, "&").replace(/</g, "<").replace(/>/g, ">").split(wym._newLine + wym._newLine); }else{ console.info("=== NOT escape")
// 增加这一句。 非常关键。 aP = [aP] } var rExp = new RegExp(wym._newLine, "g");
4. 修改核心的ruby文件(增加上传图片到CDN的接口) blogs_controller
require 'base64'
require 'upyun'

class Interface::BlogsController < ActionController::Base
  def upload_paste_image_to_cdn
    bucket = Settings.upyun.bucket
    operator = Settings.upyun.operator
    password = Settings.upyun.password

    base_64_encoded_data = params[:image_content]

    unless base_64_encoded_data.include?("data:image/png;base64,")
      raise "It's not an png image"
      return
    end

    local_file = 'temp.png'
    File.open(local_file, 'wb') do |f|
      f.write(Base64.decode64(base_64_encoded_data.gsub("data:image/png;base64,", '')))
    end
    upyun = Upyun::Rest.new(bucket, operator, password)
    remote_file = "/blog_images/from_paste_#{Time.now.strftime('%Y%m%d_%H%M%S')}.png"

    response = upyun.put remote_file, local_file
    render :json => {
      :response => response,
      :url => "https://files.sweetysoft.com#{remote_file}",
    }
  end
5. 增加ruby路由文件:
post '/interface/blogs/upload_paste_image_to_cdn', to: 'interface::blogs#upload_paste_image_to_cdn',
基本就可以了。
几个小插曲
1. ruby 1.9.3 实在是古老,但是我没有太多的时间去弄refinery-cms. 只好先这样了。
2. 修改Gemfile, 要使用node 作为js runtime, 不要使用遗留的execjs 等Gem .
(通过修改 config/environments/production.rb 来实现,注释掉下面的代码:
config.assets.compress = true
)否则你会遇到奇怪的问题,参考: https://stackoverflow.com/questions/12574977/rake-assetsprecompile-gives-punc-error
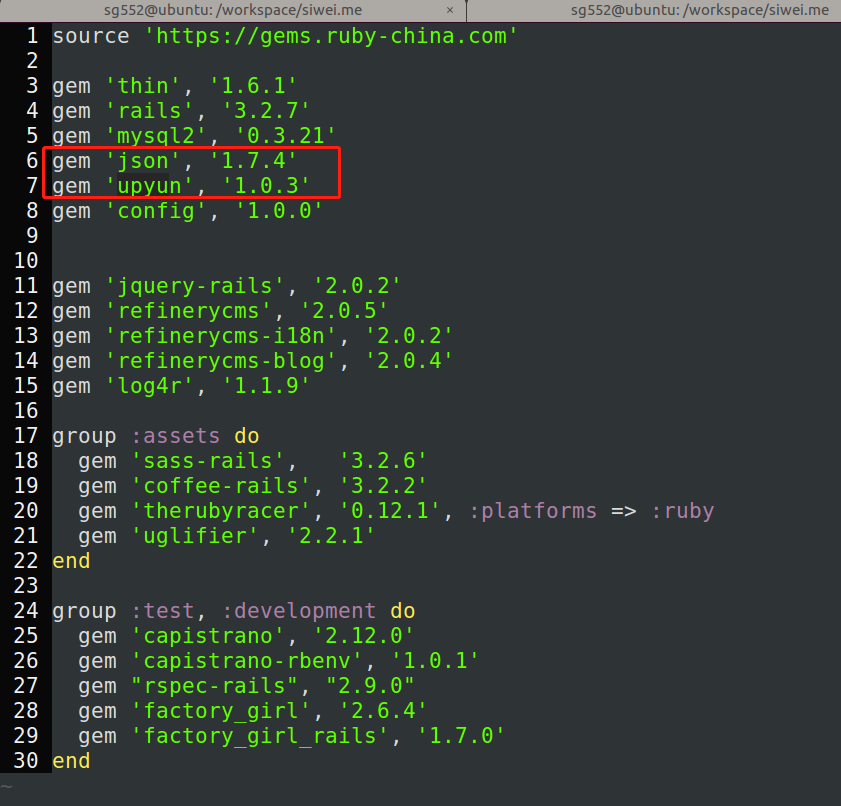
3. 需要提前到upyun上做个申请。然后把内容记录在 config/settings.yml 中。
4. upyun 这个rubygem 对于1.9.3的ruby版本,不能使用最新的,要使用比较古老一些的版本。否则会报错。
另外上传文件的时候,直接使用本地文件名即可。否则使用File.read(file_name)的话会报错。(这个图片意义不大,只是为了炫耀哈哈)